How to Set Up a NAS from Scratch: Installation, Configuration, RAID Users, and Remote Access

Setting up a NAS (Network Attached Storage) from scratch can transform how you store, share, and protect your data. Many people think NAS is only for large companies, but it’s also powerful for homes, small offices, and anyone who wants reliable file access. This guide will help you install, configure, set up RAID, manage users, and enable remote access. Even if you’re not an expert, you’ll find clear steps and practical tips. You’ll also learn how to avoid common mistakes and make smart choices for your needs.
Understanding Nas: Why And How?
A NAS is a dedicated device for storing files that connects to your network. Unlike a regular external drive, a NAS gives you access to files from any device on your network — computers, phones, or tablets. You can also share files with others and back up your important data automatically.
Benefits Of A Nas
-
- Centralized storage: All files in one place, easy to organize and access.
-
- Automatic backups: Protects against data loss.
-
- Remote access: Reach your files from anywhere.
-
- User management: Control who sees what.
In 2026, the global NAS market was valued at $21.7 billion, and it keeps growing as more people need secure, easy-to-use storage.
Choosing Your Nas Hardware
Before installation, you need to pick the right NAS hardware. The options vary from simple, affordable models to powerful units with advanced features.
Key Factors To Consider
-
- Drive Bays: The number of slots for hard drives. For home users, 2-4 bays are common. For businesses, 4-8+ bays allow more storage.
-
- Processor and RAM: Faster CPUs and more RAM mean better performance, especially for multiple users.
-
- Connectivity: Look for Gigabit Ethernet ports and sometimes USB or HDMI.
-
- Supported Drives: Make sure your NAS accepts the drives you have or plan to buy (HDD or SSD).
Popular Nas Brands
Some of the most trusted NAS brands are Synology, QNAP, and Western Digital. Their models range from basic to advanced. Here’s a comparison of three popular NAS choices:
| Model | Bays | CPU | RAM | Max Users | Price (USD) |
|---|---|---|---|---|---|
| Synology DS220+ | 2 | Intel Celeron | 2 GB | 10 | 330 |
| QNAP TS-453D | 4 | Intel Celeron | 4 GB | 30 | 500 |
| WD My Cloud EX2 | 2 | Marvell ARM | 1 GB | 8 | 250 |
Hard Drives For Nas
NAS devices need special hard drives designed for continuous operation. Regular desktop drives can wear out faster. Look for drives labeled “NAS” or “Enterprise.” Popular choices include WD Red and Seagate IronWolf.
Mistakes To Avoid
-
- Choosing too few bays: Limits future storage.
-
- Using regular drives: Shorter lifespan, more failures.
-
- Ignoring RAM: Low RAM slows down multitasking.
Preparing For Nas Installation
To begin, gather your NAS device, compatible hard drives, network cables, and a computer for setup. Check your router and network switch to ensure enough ports and speed.
Planning Your Storage
Decide how much space you need. For example, a 2-bay NAS with two 4 TB drives gives you up to 8 TB, but RAID (explained soon) can affect usable space.
Checking Compatibility
Read your NAS manual for drive size, file system, and network requirements. Most NAS devices use SATA drives and connect via Ethernet.
Installing Your Nas Device
The physical setup is simple but must be done carefully.
Step-by-step Installation
-
- Install the hard drives: Open the NAS case and slide each drive into a bay. Secure with screws if needed.
-
- Connect to the network: Plug an Ethernet cable from the NAS to your router or switch.
-
- Power on: Plug in the NAS and switch it on.
-
- Access the NAS setup page: Use a computer on the same network. Usually, you enter an IP address in your browser, like 192.168.1.100, or use a setup tool from the manufacturer.
Example: Synology Initial Setup
-
- Download Synology Assistant from their website.
-
- The tool finds your NAS on the network.
-
- Follow on-screen instructions to install the operating system (DSM).
Common Issues
-
- NAS not visible on network: Check cables, router settings.
-
- Drive not detected: Ensure correct installation and drive compatibility.
Configuring Your Nas: Essential Settings
After physical setup, the real configuration begins. This step is key for performance and security.
Initial Setup
Network Settings
Most NAS units use DHCP to get an IP address. For reliability, set a static IP so your NAS always has the same address.
File System Choices
Some NAS devices let you choose a file system. EXT4 and Btrfs are popular. Btrfs offers snapshots and better error checking, but EXT4 is widely supported.
Enabling Services
Decide which services you need:
-
- SMB/CIFS: For Windows file sharing.
-
- AFP: For Mac file sharing.
-
- NFS: For Linux access.
-
- FTP/SFTP: For remote file transfer.
Enable only what you need to reduce security risks.
Setting Up Raid: Protecting Your Data
RAID (Redundant Array of Independent Disks) is a system to improve speed, reliability, or both. Setting up RAID is one of the most important steps for your NAS.
Common Raid Types
-
- RAID 0 (Stripe): Combines drives for speed, but no protection. One drive fails, all data lost.
-
- RAID 1 (Mirror): Copies data to two drives. If one fails, data is safe.
-
- RAID 5: Uses three or more drives. Balances speed and protection. One drive can fail without data loss.
-
- RAID 6: Needs four or more drives. Protects against two drive failures.
-
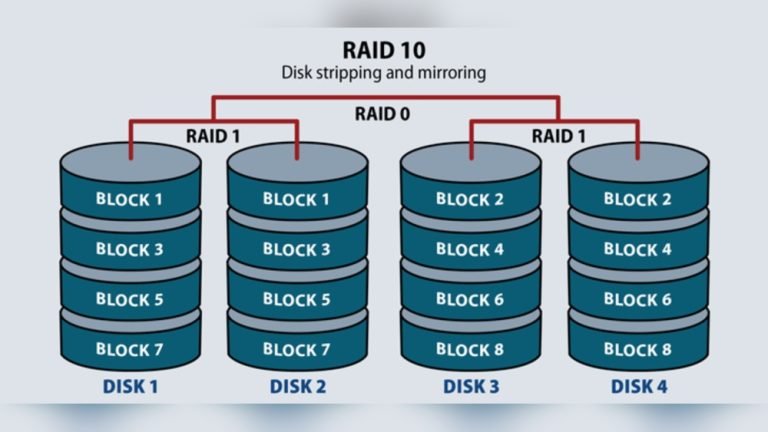
- RAID 10: Combines RAID 1 and RAID 0. Fast and safe, needs four drives.
Here’s a table comparing RAID modes:
| RAID Type | Min Drives | Usable Space | Protection | Speed | Common Use |
|---|---|---|---|---|---|
| RAID 0 | 2 | 100% | No | High | Performance |
| RAID 1 | 2 | 50% | Yes | Medium | Home Backup |
| RAID 5 | 3 | (N-1)/N | Yes | High | Small Business |
| RAID 6 | 4 | (N-2)/N | Yes | Medium | Critical Data |
| RAID 10 | 4 | 50% | Yes | High | Large Office |
Setting Raid In Your Nas
-
- During setup, select RAID type.
-
- The NAS will format the drives and create the array.
-
- This process can take several hours, depending on size.
Practical Tips
-
- Back up your data before creating RAID.
-
- Use identical drives for best performance.
-
- Monitor drive health with NAS tools.
Non-obvious Insight
Most beginners overlook RAID expansion. Some NAS devices let you add drives and expand RAID without losing data. Check your model before buying.
Creating And Managing Users
NAS devices support multiple users, so you can share access with family, friends, or coworkers.
User Creation
-
- Go to the Users section in your NAS control panel.
-
- Create new users with unique usernames.
-
- Set strong passwords.
Assigning Permissions
-
- Decide which folders each user can access.
-
- Limit some users to read-only if you don’t want them to change files.
-
- Create user groups for easier management. For example, “Family” or “Work.”
Setting Quotas
Quotas help you control how much space each user can use. This prevents one person from filling up the NAS.
Example
A family NAS might have:
-
- Parent (admin): Full access
-
- Child: Access to homework and photos, no admin rights
-
- Guest: Access to shared folder only
Common Mistakes
-
- Giving everyone admin rights: Risky for security.
-
- No quotas: One user can fill up storage.
Non-obvious Insight
Some NAS units support directory-level permissions. This means you can restrict access not just by folder, but by subfolder, giving fine control.
Setting Up Shared Folders
Shared folders are the main way users access files on a NAS. Each folder can have different permissions and purposes.
Creating Shared Folders
-
- Go to the Shared Folder section in your NAS settings.
-
- Name the folder (like “Photos” or “Projects”).
-
- Choose which users or groups can access it.
Folder Permissions
-
- Read/Write: User can view and change files.
-
- Read-only: User can view but not change.
-
- No access: User cannot see the folder.
Organizing Folders
Keep folders organized by purpose:
-
- Media: Movies, music, photos
-
- Documents: Work files, PDFs
-
- Backups: Device backups
Tips
-
- Use clear folder names.
-
- Review permissions regularly.
-
- Enable folder snapshots if your NAS supports it. Snapshots let you recover files if they’re accidentally deleted.
Enabling Remote Access
Remote access is one of the biggest advantages of a NAS. You can reach your files from anywhere, not just your local network.
Methods For Remote Access
-
- Web Interface: Most NAS units offer a web portal. Log in from any browser.
-
- Mobile Apps: Many brands have apps for iOS and Android.
-
- FTP/SFTP: For secure file transfers.
-
- Cloud Sync: Sync files with Google Drive, Dropbox, etc.
-
- VPN: Secure remote access as if you’re on your local network.
Setting Up Remote Access
-
- Enable QuickConnect, MyCloud, or similar services in your NAS settings.
-
- Register your NAS with the manufacturer’s service.
-
- Configure port forwarding on your router if needed. This step lets outside connections reach your NAS.
Security Tips
-
- Use SSL/TLS encryption for web access.
-
- Set strong passwords and two-factor authentication.
-
- Update firmware regularly.
Example: Synology Quickconnect
-
- Go to QuickConnect settings.
-
- Create an account.
-
- Your NAS gets a unique address: Quickconnect.to/yourname
Common Problems
-
- Ports blocked: Check router settings.
-
- Slow access: Limit remote connections or upgrade internet speed.
Non-obvious Insight
Remote access can expose your NAS to cyber risks. Many beginners don’t realize that default ports (like 5000 or 80) are easy targets. Change default ports and monitor access logs.
Backups And Sync: Keeping Data Safe
NAS devices are not only for storage — they help keep your data safe with automatic backups and synchronization.
Setting Up Backups
-
- Enable scheduled backups in your NAS control panel.
-
- Back up computers to the NAS using built-in tools (Time Machine for Mac, Windows Backup for PC).
-
- Back up the NAS itself to an external drive or cloud service.
Syncing Files
-
- Use cloud sync features to copy files to Google Drive, OneDrive, or Dropbox.
-
- Sync between multiple NAS units for redundancy.
Backup Strategies
-
- Local backup: Back up devices to NAS.
-
- Remote backup: Back up NAS to another NAS or cloud.
-
- Snapshot backup: Take snapshots for quick recovery.
Example Backup Plan
A small business might:
-
- Back up workstations daily to NAS.
-
- NAS syncs to cloud weekly.
-
- Monthly external drive backup stored offsite.
Tips
-
- Test backups regularly.
-
- Keep at least three copies of important data (the “3-2-1 rule”: Three copies, two locations, one offsite).
-
- Use RAID and backups together for maximum safety.
Monitoring And Maintenance
Good maintenance keeps your NAS running smoothly and prevents surprises.
Monitoring Tools
Most NAS devices have dashboards showing:
-
- Drive health
-
- Temperature
-
- Network activity
-
- User activity
Set up alerts for drive failures, overheating, or unusual access.
Maintenance Tasks
-
- Firmware updates: Protect against bugs and security holes.
-
- Check drive health: Use SMART monitoring.
-
- Clean dust: Open NAS and clean fans yearly.
-
- Review logs: Look for unauthorized access or errors.
Non-obvious Insight
Some NAS devices let you schedule automatic tests. Beginners often skip these, but regular SMART tests catch problems early.
Expanding And Upgrading Your Nas
Your needs may grow, so planning for expansion is smart.
Adding More Drives
-
- Check if your NAS supports RAID expansion.
-
- Insert new drives and follow prompts to add to existing RAID.
Upgrading Ram
-
- Some NAS units let you add RAM for better performance.
-
- Buy compatible modules and follow manufacturer instructions.
Upgrading Firmware
-
- Regular updates add new features and fix security risks.
-
- Schedule updates during low-traffic times to avoid disruptions.
Example: Qnap Ram Upgrade
-
- QNAP TS-453D supports up to 16 GB RAM.
-
- Remove cover, insert new module, boot NAS.
Mistakes To Avoid
-
- Mixing old and new drives: Slower performance.
-
- Skipping firmware updates: Vulnerable to attacks.
Troubleshooting Common Nas Problems
Even with good setup, issues can happen. Quick troubleshooting helps keep your NAS reliable.
Nas Not Accessible
-
- Check network cables and power.
-
- Restart router and NAS.
-
- Use manufacturer’s discovery tool.
Drive Failure
-
- Replace failed drive as soon as possible.
-
- Rebuild RAID according to NAS instructions.
Slow Performance
-
- Upgrade RAM or switch to SSDs.
-
- Reduce active users or background tasks.
File Access Issues
-
- Check user permissions.
-
- Reset passwords if forgotten.
-
- Use correct network protocol (SMB, NFS, etc. ).
Remote Access Not Working
-
- Verify port forwarding.
-
- Check firewall settings.
-
- Update NAS remote access software.
Non-obvious Insight
Many beginners forget to check DNS settings. If NAS IP changes or DNS is misconfigured, devices may lose access. Set static IPs and check DNS records.
Nas Security: Keeping Your Data Protected
Security is critical, especially with remote access. Take steps to protect files and users.
Basic Security Steps
-
- Use strong passwords for all users.
-
- Enable two-factor authentication.
-
- Limit admin accounts.
-
- Disable unused services.
Advanced Security
-
- Use firewall features built into the NAS.
-
- Change default ports.
-
- Enable SSL/TLS encryption.
-
- Set up IP blocking for repeated failed logins.
Example: Synology Security Advisor
-
- Runs automatic checks for vulnerabilities.
-
- Gives recommendations for password strength, firmware, and network security.
Security Statistics
In 2026, over 5,000 NAS devices were affected by ransomware attacks, mostly due to weak passwords and outdated firmware.
Tips
-
- Teach users about phishing and safe password use.
-
- Back up data separately from NAS in case of attack.
-
- Review security logs weekly.
Integrating Nas With Smart Home And Office
NAS units do more than store files. They can enhance your smart home or office setup.
Smart Home Integration
-
- Store security camera footage directly to NAS.
-
- Share media with smart TVs and speakers.
Office Integration
-
- Collaborate on documents in real time.
-
- Use NAS for printer sharing and backups.
Example: Media Server
Many NAS devices support Plex or DLNA, letting you stream videos and music to TVs or phones.
Tips
-
- Check compatibility with smart devices.
-
- Use wired connections for streaming large files.
Real-world Example: Home Nas Setup
Let’s walk through a typical home setup for a family of four.
-
- NAS Device: Synology DS220+
-
- Drives: 2 x 4 TB WD Red
-
- RAID: RAID 1 for safety
-
- Users: Parent (admin), 2 kids, 1 guest
-
- Folders: Photos, Homework, Shared Media
-
- Remote Access: Enabled with QuickConnect
-
- Backups: Each computer backs up to NAS weekly
-
- Security: Strong passwords, two-factor authentication, regular firmware updates
This setup covers storage, sharing, backup, and security, all managed from a simple web interface.
Nas Performance Comparison: Home Vs Business
Here’s a simple comparison to show how NAS devices differ in home and business settings.
| Feature | Home NAS | Business NAS |
|---|---|---|
| Max Users | 10 | 100+ |
| Drive Bays | 2-4 | 8-24 |
| RAM | 2-8 GB | 16-64 GB |
| RAID Support | RAID 0, 1 | RAID 5, 6, 10 |
| Remote Access | Basic | Advanced (VPN, Cloud) |
| Backup Options | Local, Cloud | Local, Cloud, Offsite |
Frequently Asked Questions
How Much Storage Do I Need For My Nas?
The right amount depends on your usage. For home, 4-8 TB is enough for photos, videos, and backups. Businesses may need 20+ TB. Always plan for growth; it’s better to have extra space than run out.
Which Raid Type Should I Use For Home Nas?
RAID 1 is best for safety in home use. It mirrors your data, so if one drive fails, you don’t lose anything. If you need more speed and have three drives, consider RAID 5, but data safety is lower.
Can I Access My Nas From Anywhere?
Yes. Most NAS devices offer remote access via web portals or apps. You need to set up port forwarding or use manufacturer services like QuickConnect. Always secure remote access with strong passwords and encryption.
What Happens If A Drive Fails In My Nas?
If you use RAID 1, 5, or 6, your data stays safe. The NAS will alert you, and you should replace the failed drive quickly. The NAS rebuilds the array automatically. If you use RAID 0, all data is lost.
Do I Need To Back Up My Nas?
Yes. RAID protects against drive failure, but not against accidental deletion, viruses, or disasters. Always back up important data to another NAS, cloud, or external drive.
Setting up a NAS is a smart move for anyone who values their data and wants easy access, sharing, and protection. By following these steps, you’ll have a reliable storage system that grows with your needs. If you want deeper technical guidance or more advanced NAS options, check out the Wikipedia NAS page for expert-level details. Your NAS is more than just storage — it’s a powerful tool for managing your digital life.